Some time ago I discovered that optical mouse’s sensors are small cameras thanks to this article. I put it in my ToDo list and today I found some time to try it. Took apart some old mouses I have stored these years but none of them has an ADNS-2051 sensor, but they have the ADNS-5020 instead that it’s almost the same. So I took a Logitech LX3 and tore it down.

The ADNS-5020 is an CMOS optical sensor, it takes black and white 15 x 15 px images, and calculates the movement of the mouse from those. It has SPI so I used an Arduino to interface with it. But I had to make some modifications to the circuit first to isolate the sensor from other components.
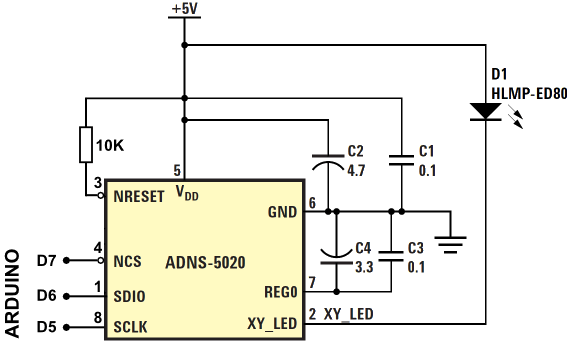
There are two options: remove the CY7C63813 IC and the R2 resitance, or cut th traces to these components. To keep the ADNS-5020 turned on, connect a 10K pull-up resistor between +5v and NRESET. Arduino’s D5, D6 y D7 pins are connected to SCLK, SDIO and NCS respectively. The circuit should look like something like this:
The software consist in two parts. The Arduino sketch that interfaces with the sensor and sends the images:
#include <SPI.h>

int SCLK = 5;
int SDIO = 6;
int NCS  = 7;

void setup() {
  Serial.begin(9600);

  pinMode(SCLK, OUTPUT);
  pinMode(SDIO, OUTPUT);
  pinMode(NCS, OUTPUT);

  mouse_reset();
  delay(10);
}

void loop() {
  char img[225];
  for (int i=0;i<225;i++){
      img[i]=readLoc(0x0b);
      img[i] &= 0x7F;
      img[i]+=1;
      Serial.print(img[i], DEC);
      Serial.print(",");
      delay(2);
  }
  Serial.println();
  delay(500);
}

void mouse_reset(){
  // Initiate chip reset
  digitalWrite(NCS, LOW);
  pushbyte(0x3a);
  pushbyte(0x5a);
  digitalWrite(NCS, HIGH);
  delay(10);
  // Set 1000cpi resolution
  digitalWrite(NCS, LOW);
  pushbyte(0x0d);
  pushbyte(0x01);
  digitalWrite(NCS, HIGH);
}

unsigned int readLoc(uint8_t addr){
  unsigned int ret=0;
  digitalWrite(NCS, LOW);
  pushbyte(addr);
  ret=pullbyte();
  digitalWrite(NCS, HIGH);
  return(ret);
}

void pushbyte(uint8_t c){
  pinMode(SDIO, OUTPUT);
  for(unsigned int i=0x80;i;i=i>>1){
    digitalWrite(SCLK, LOW);
    digitalWrite(SDIO, c & i);
    digitalWrite(SCLK, HIGH);
  }
}

unsigned int pullbyte(){
  unsigned int ret=0;
  pinMode(SDIO, INPUT);
  for(unsigned int i=0x80; i>0; i>>=1) {
    digitalWrite(SCLK, LOW);
    ret |= i*digitalRead(SDIO);
    digitalWrite(SCLK, HIGH);
  }
  pinMode(SDIO, OUTPUT);
  return(ret);
}
And visor.py that reads the images from a serial connection and shows them on a PyQt window:
#!/usr/bin/env python3
# -*- coding: utf-8 -*-

import sys, serial, threading
from PyQt5.QtWidgets import QApplication, QWidget, QLabel
from PyQt5.QtGui import QIcon, QPixmap
from PIL import Image, ImageDraw, ImageQt


class App(QWidget):

    def __init__(self):
      super().__init__()
      self.title = 'PyQt5 Mousecam ADNS 5020'
      self.left = 10
      self.top = 10
      self.width = 640
      self.height = 480
      self.initUI()

    def initUI(self):
      self.setWindowTitle(self.title)
      self.setGeometry(self.left, self.top, self.width, self.height)
      # Create widget
      self.label = QLabel(self)
      pixmap = QPixmap('fondo.jpg')
      self.label.setPixmap(pixmap)
      self.resize(pixmap.width(),pixmap.height())

      self.show()

    def mousecam(self):
      moo = serial.Serial('/dev/ttyUSB0', 9600)
      while True:
        msg = moo.readline().decode()
        print(msg)
        img = list(map(int,msg.strip()[:-1].split(',')))
        print(img)
        im=Image.new('RGB', (15,15), None)
        draw=ImageDraw.Draw(im)

        for i, value in enumerate(img):
          j = i // 15
          i = i - j * 15
          c = int(value * 2.4)

          draw.point((i,j),(c,c,c))

        im2 = im.resize((512,512))
        qim = ImageQt.ImageQt(im2)
        pix = QPixmap.fromImage(qim)
        self.label.setPixmap(pix)

if __name__ == '__main__':
  app = QApplication(sys.argv)
  ex = App()
  MouseCamThread = threading.Thread(target=ex.mousecam)
  MouseCamThread.daemon = True
  MouseCamThread.start()
  sys.exit(app.exec_())
As a result we can see the images captured by the sensor. I did some test with 6pt text and some letters could be seen, I’m sure it can be improved playing with the contrast.
There are better sesors with higher resolution and fps for gamimg as you can see in the [manufacturer’s catalogue](media.digikey.com/PDF/Data Sheets/Avago PDFs/ToolKitSelectionGuide.pdf), so the results of the experiment could be improved.
If someone wants to try it or improve it, I have uploaded the source code and documentation to a repository in Github.