Hace tiempo decubrí que los sensores de los ratones ópticos son cámaras gracias a este artículo. Lo puse en la lista de cosas pendientes hasta hoy que he encontrado un rato para investigar. He abierto algunos ratones hechos polvo que tengo guardados y ninguno tiene sensor ADNS-2051, pero si el ADNS-5020 que funciona de forma parecida. Así que he cogido un Logitech LX3 y lo he destripado.

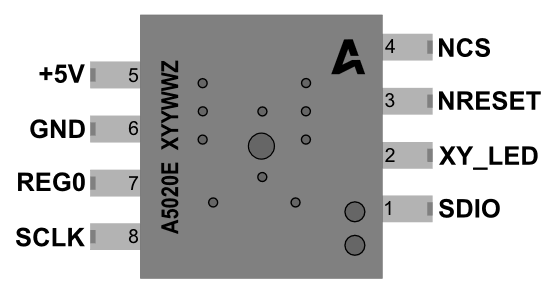
El ADNS-5020 es un sensor óptico que toma imágenes de 15 x 15 píxeles en blanco y negro, y es capaz de calcular el movimiento en los ejes X e Y a partir de ellas. Tiene un interfaz SPI, así que he usado un Arduino Nano para conectarme a él. Pero antes hay que hacer algunas modificaciones al circuito para aislar al sensor.
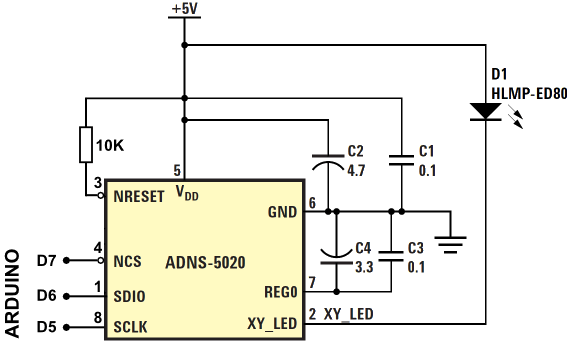
Para ello hay que o bien retirar el CY7C63813 y la resistencia R2 o cortar las pistas a estos componentes. También hay que conectar una resistencia pull-up de 10k entre +5v y NRESET para mantener el ADNS-5020 encendido. Los pins D5, D6 y D7 del Arduino se conectan a SCLK, SDIO y NCS respectivamente. EL circuito resultante debe quedar algo así:
El software consta de dos parte. El sketch que conecta con el sensor y manda las imágenes:
#include <SPI.h>

int SCLK = 5;
int SDIO = 6;
int NCS  = 7;

void setup() {
  Serial.begin(9600);

  pinMode(SCLK, OUTPUT);
  pinMode(SDIO, OUTPUT);
  pinMode(NCS, OUTPUT);

  mouse_reset();
  delay(10);
}

void loop() {
  char img[225];
  for (int i=0;i<225;i++){
      img[i]=readLoc(0x0b);
      img[i] &= 0x7F;
      img[i]+=1;
      Serial.print(img[i], DEC);
      Serial.print(",");
      delay(2);
  }
  Serial.println();
  delay(500);
}

void mouse_reset(){
  // Initiate chip reset
  digitalWrite(NCS, LOW);
  pushbyte(0x3a);
  pushbyte(0x5a);
  digitalWrite(NCS, HIGH);
  delay(10);
  // Set 1000cpi resolution
  digitalWrite(NCS, LOW);
  pushbyte(0x0d);
  pushbyte(0x01);
  digitalWrite(NCS, HIGH);
}

unsigned int readLoc(uint8_t addr){
  unsigned int ret=0;
  digitalWrite(NCS, LOW);
  pushbyte(addr);
  ret=pullbyte();
  digitalWrite(NCS, HIGH);
  return(ret);
}

void pushbyte(uint8_t c){
  pinMode(SDIO, OUTPUT);
  for(unsigned int i=0x80;i;i=i>>1){
    digitalWrite(SCLK, LOW);
    digitalWrite(SDIO, c & i);
    digitalWrite(SCLK, HIGH);
  }
}

unsigned int pullbyte(){
  unsigned int ret=0;
  pinMode(SDIO, INPUT);
  for(unsigned int i=0x80; i>0; i>>=1) {
    digitalWrite(SCLK, LOW);
    ret |= i*digitalRead(SDIO);
    digitalWrite(SCLK, HIGH);
  }
  pinMode(SDIO, OUTPUT);
  return(ret);
}
Y el visor que recibe las imágenes por el puerto serie y las muestra en una ventana con PyQT5:
#!/usr/bin/env python3
# -*- coding: utf-8 -*-
import sys, serial, threading from PyQt5.QtWidgets import QApplication, QWidget, QLabel from PyQt5.QtGui import QIcon, QPixmap from PIL import Image, ImageDraw, ImageQt

class App(QWidget):

def __init__(self):
  super().__init__()
  self.title = 'PyQt5 Mousecam ADNS 5020'
  self.left = 10
  self.top = 10
  self.width = 640
  self.height = 480
  self.initUI()

def initUI(self):
  self.setWindowTitle(self.title)
  self.setGeometry(self.left, self.top, self.width, self.height)
  # Create widget
  self.label = QLabel(self)
  pixmap = QPixmap('fondo.jpg')
  self.label.setPixmap(pixmap)
  self.resize(pixmap.width(),pixmap.height())

  self.show()

def mousecam(self):
  moo = serial.Serial('/dev/ttyUSB0', 9600)
  while True:
    msg = moo.readline().decode()
    print(msg)
    img = list(map(int,msg.strip()[:-1].split(',')))
    print(img)
    im=Image.new('RGB', (15,15), None)
    draw=ImageDraw.Draw(im)

    for i, value in enumerate(img):
      j = i // 15
      i = i - j * 15
      c = int(value * 2.4)

      draw.point((i,j),(c,c,c))

    im2 = im.resize((512,512))
    qim = ImageQt.ImageQt(im2)
    pix = QPixmap.fromImage(qim)
    self.label.setPixmap(pix)
if name == 'main': app = QApplication(sys.argv) ex = App() MouseCamThread = threading.Thread(target=ex.mousecam) MouseCamThread.daemon = True MouseCamThread.start() sys.exit(app.exec_())
Como resultado podemos ver las imágenes capturadas por el sensor. He probado con texto de 6 puntos y se diferencian las letras, pero seguro que puede hacerse algo con el contraste para que se vean mejor.
Existen sensores con mayor resolución y mejor fps para gaming como se puede ver en el catálogo del fabricante , es probable que con esos se consigan mejores resultados.
He subido el código y la documentación del sensor a un repositorio en Github por si alguien quiere experimentar y mejorar lo hecho hasta ahora.